vbAdvance is a Visual Basic Add-In which gives access to advanced build features and many IDE convenience features. This post covers some advanced topics, and discusses some of the samples included with the package.
Webmasters Note
I attempted to contact Karl Peterson, Young Dynamic Software, and the webmaster of mvps.org, with no success.
I have approved the posting of this content on the basis that the persons or entities listed appear to have no further interest in the content, as well as the copyrights appear to have not been updated since at least 2007 for the content, or 2011 for mvps.org.
If any of the people or entities listed above have questions, comments or concerns with this post, please don’t hesitate to use the contact form in the footer below to get ahold of me.
Concepts
VB5 and VB6 are able to build true Win32 native code executables by using what is essentially the Visual C++ compiler and linker. These build tools are a part of every VB 5 and VB 6 installation* and are as full featured as those found in Visual C++. However, the Visual Basic user interface provides access to only a subset of the capabilities found in this extremely powerful build system. For example, function exports and console subsytem applications can be built using the tools that ship with VB 5 and 6, but VB does not provide you with a way to access these features. The features are not missing, you just aren’t given a way to access them.
vbAdvance gives you this access. On a per-project basis, you are able to access and configure these powerful build settings, as well as a host of other IDE convenience features. The result is that a range of capabilities that were previously unavailable are now made available to VB developers.
In addition to the build system enhancements, vbAdvance also extends the VB IDE, adding convenience features like Syntax Checking and clearing the Immediate Window when you run your project. vbAdvance is a fast, efficient tool that greatly enhances VB’s build capabilities, and makes the Visual Basic IDE better and easier to use.
As a Visual Basic Add-In, vbAdvance runs while you design and compile your applications. Once your app is built, vbAdvance is no longer needed. vbAdvance adds no distributable dependencies to your projects – there is nothing to distribute because vbAdvance is only needed by the VB IDE.
All vbAdvance project settings are stored as plain text in your project’s VBP file, ensuring your settings migrate easily with each project, and making it easy to set up advanced build configurations with automated build tools. These settings in no way interfere with the normal workings of VB, and you can build the same project on a machine without vbAdvance installed, without incident. (Albeit also without the advanced build features offered by vbAdvance.)
Because some of the features exposed by vbAdvance were not designed into Visual Basic, special care must be exercised when using these features. You must have a solid understanding of Windows programming to take complete advantage of this tool. At the same time, many of the features will be appreciated by even novice programmers.
* Applies to Visual Basic Professional and Enterprise Editions. Visual Basic Learning edition does not permit creation of native code executables.
Installation
vbAdvance is distributed as a single self-extracting installer EXE. Double-click the EXE to launch the installation process. You will be presented with standard installation options. Once installed, the add-in will load automatically the next time you start VB. The vbAdvance Toolbar will be floating in the center of the screen and may be repositioned and docked to your liking.
To uninstall the add-in, go to the Add/Remove Programs Control Panel, select vbAdvance, and select Uninstall. Alternatively, you may launch the uninstaller from the vbAdvance Start Menu entry.
If you are upgrading from a previous version, you may simply run the installer over your existing version. You do not need to first uninstall a previous version.
Registration
vbAdvance is now unsupported freeware. Use the following license to register the product:
BEGIN LICENSEUNSUPPORTED_FREEWARE_VERSIONUNSUPPORTED_FREEWARE_VERSIONDC4C5AED5405F6CC5405E5C733943394247C616841190441039539253EB3B5FFEND LICENSE
Copy it all (include the BEGIN and END LICENSE lines). In the Advanced Options dialog, click on the “About” button, then click on the “Register” button. Paste your registration info and click OK.
Requirements
Visual Basic Professional or Enterprise Edition version 5 or 6 / Service Pack 3 or higher.
Any Microsoft-supported Win32 operating system (server or workstation): Windows 98, ME, NT 4.0 (SP#4 or later), 2000, XP.
Native code compilations only, p-code is not supported.
For building resource-only DLLs, a copy of cvtres.exe is necessary. This utility is not redistributable and so is not installed with vbAdvance. cvtres.exe is installed with Visual C++, and is also downloadable from Microsoft’s website. At the time of this writing, the file was available at the following location:
http://download.microsoft.com/download/vstudio97pro/Patch/1/WIN98/EN-US/Cvtres1.exe
The download link is also specified in Knowledge Base article Q187280.
Distribution
As a Visual Basic Add-In, vbAdvance runs while you design and compile your applications. Once your app is built, vbAdvance is no longer needed. vbAdvance has no distribution requirements – there is nothing to distribute because vbAdvance is only needed by the VB IDE.
You are expressely forbidden from distributing the vbAdvance.dll DLL, the vbAdvance.tlb Type Library or any of the vbAdvance sample code as raw source code. You are allowed to use the sample source code in your own projects, provided it is only distributed in compiled form.
Notes
The vbAdvance.tlb TypeLibrary is provided for your use. You may freely use this file in your applications. However, you do not need to distribute it with your application, nor are you allowed to. This file is required by many of the sample applications.
Because vbAdvance gives you access to features of the VB compiler and linker, and because the compiler and linker are only used when compiling to native code, these features can only be realized in native code compiled projects. P-code compilations are not supported in vbAdvance.
Because vbAdvance exposes functionality that VB was not intended to expose, we cannot provide support beyond that which the product claims to accomplish. i.e. If you wish to export a function, we will only guarantee that the export exists, we will not guarantee that it will be callable under all conditions. What you do with the export is up to you. We are merely giving you the capability.
Due to the nature of some of the techniques vbAdvance must use to control the VB build environment, there may be conflicts with other add-ins that use these same techniques. Should this occur, we will evaluate the conflict to determine if a workaround exists. Note however, that there may be nothing that can be done and that vbAdvance may not be able to coexist with some add-ins. This situation should be rare.
Command Line Builds
Command-line builds are fully supported in vbAdvance. To use the command-line feature of vbAdvance, simply set the Load Behavior for the add-in to “Command Line”. Due to a bug in VB, you cannot set the add-in’s Load Behavior to both “Load On Startup” and “Command Line”. These two settings are mutually exclusive and you must pick one or the other. If both are selected, then “Load On Startup” is used and the add-in will not load on a command line build.
Toolbar
The vbAdvance Toolbar displays six buttons:

- Advanced Options – This button brings up the Advanced Options dialog which allows you to configure your project’s advanced build settings, as well as the advanced IDE settings.
- Send Current Code Module to Text Editor – This sends the currently viewed code module to your default text editor. This allows you to use a far more powerful code editor in concert with the VB IDE.
- Check Syntax – This button runs the VB compiler up to, but not including, the point where a binary is built, giving you a full syntax check of your code without the hassles of having to generate a binary.
- Build – This button builds your binary without the dialog boxes. This is the equivalent of selecting File->Make but without the “Make Project” and “Do you want to replace it?” dialogs that pop up.
- Execute – This button runs your binary, if it exists.
- Make Resource-Only DLL – This button builds a resource-only DLL if you have a resource file in your project.
Advanced Options
The Advanced Options dialog contains five tabs:
- Build Options – Settings for the various build options.
- Exports – Specify any function exports. For DLL projects only.
- Resource-Only DLL – Settings for building a Resource-Only DLL. Not tied to a project type.
- General – All other project settings.
- IDE Settings – Settings that are not project-specific, but that affect the entire IDE.
All vbAdvance settings are found in this dialog. Press OK to accept your settings and close the dialog. Press Cancel to close the dialog without saving changes. You must save your project for any project-related settings to persist. Press About to see the About dialog. Pressing Help brings up this help file.
Build Options Tab
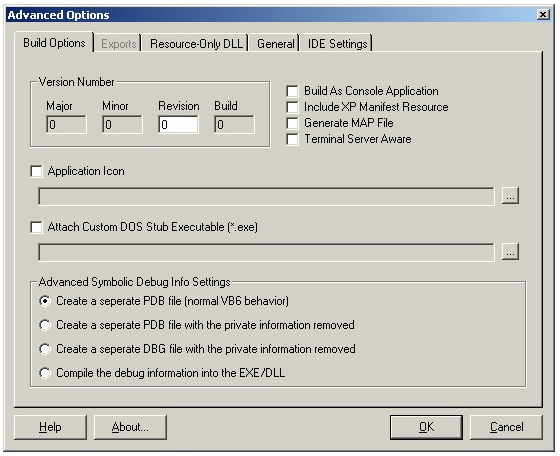
The Build Options Tab of the Advanced Options dialog contains build-specific settings:
- Version Number – Your project’s version number is set in the VB Project Properties dialog. Unfortunately, VB does not give you access to the Revision field. The field that VB calls Revision is actually the Build field of the version number. Whatever values are set in VB’s Project Properties dialog will be displayed here in the greyed out boxes. The Revision field is editable, allowing you to specify the Revision number.
The VB version fields map to the actual version fields like so:VB FieldActual FieldMajorMajorMinorMinor-RevisionRevisionBuild- Build As Console Application – Check this box to build your EXE as a Console Subsystem Application, which will allow it to interact with the Command Prompt.
- Include XP Manifest Resource – Check this to have vbAdvance automatically compile an XP Manifest into your application in order to support the new XP Themes. Note that you will also need to add a line of code to your application to initialize the Common Controls. See the following Knowledge Base article: http://support.microsoft.com/default.aspx?scid=kb;en-us;309366
- Generate MAP File – To generate a MAP file for debugging purposes, select this check box. This option automatically generates line-number information.
- Terminal Server Aware – Check this to mark your application as a Terminal Server Aware application.
- Application Icon -Use this setting to specify an icon file (*.ico) to use as your application icon.
- Attach Custom DOS Stub Executable – This setting allows you to change the default DOS Stub EXE which is compiled into your VB Windows app.
- Advanced Symbolic Debug Info Settings – If you have ‘Create Symbolic Debug Info’ checked in your Project’s Properties dialog under the Compile tab, the following debug file settings can be configured:
- Create a seperate PDB file (normal VB6 behavior) – This is the default and does not change anything. You will get a PDB file as always.
- Create a seperate PDB file with the private information removed – This setting will strip the private information from your PDB file.
- Create a seperate DBG file with the private information removed – This results in a DBG format file being generated rather than a PDB, and again with the private information stripped out.
- Compile the debug information into the EXE/DLL – This will essentially embed your PDB file into your EXE/DLL/OCX so that you do not need to ship a seperate file to take advantage of advanced debugging techniques.
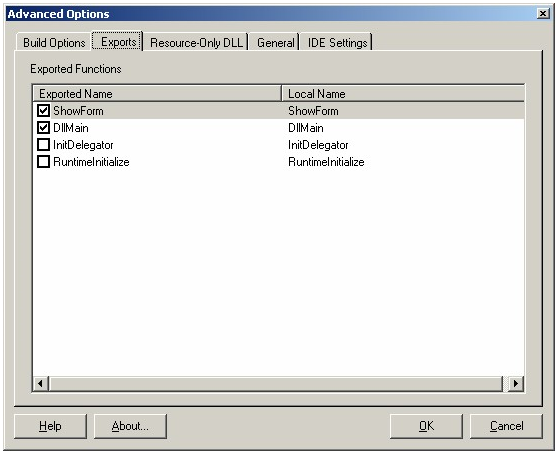 The Exports Tab of the Advanced Options dialog allows you to specify function exports for DLL projects:
- All functions available for export in your project will be listed here. To export a function from your DLL, simply check the function in the list, and build the DLL. All Public methods located in BAS modules will be listed here and are selectable for export.
- The function names must be unique – this is a limitation of the linker. It has no way to specify two exports of the same name.
- The Exported Names may be renamed. The Local Names are listed from your Public BAS functions. By default, the Exported Names will match the Local Names. The Exported Name is the name with which the export will appear. The Local Name is the function that the export will resolve to.
- To rename an Exported Name entry, slowly double-click on the Exported Name entry to place it in edit mode, or right-click the entry and select “Rename” to place it in edit mode, then type in the desired export name.
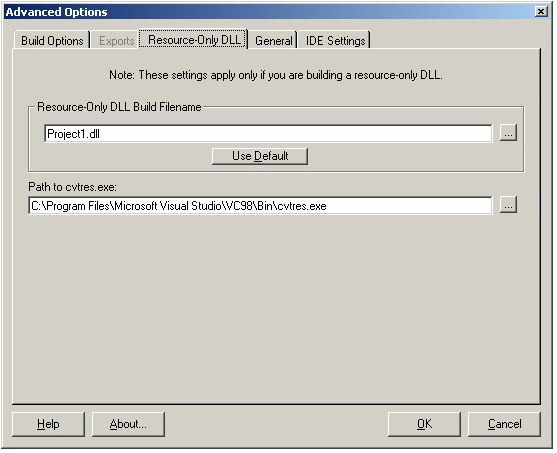 The Resource DLL Tab of the Advanced Options dialog contains settings needed for building Resource-Only DLLs:
- Resource-Only DLL Build Filename – This specifies the path and filename of the resource DLL that is built by pressing the “Make Resource-Only DLL” button on the vbAdvance toolbar.
- Use Default – This resets the Resource-Only DLL Build Filename to the default setting.
- Path to cvtres.exe – This setting is required and is used to define the location of the file “cvtres.exe”. This EXE is required for building resource-only DLLs. Unfortunately, this file is not installed with VB. It also is not redistributable and so cannot be included in the vbAdvance installation. It is installed with Visual C++. If you have Visual C++ installed, you will see the path to the file already entered. There is nothing more you need to do. If you don’t have Visual C++ installed, you can download the file from Microsoft. At the time of this writing, the file was available at this location:
http://download.microsoft.com/download/vstudio97pro/Patch/1/WIN98/EN-US/Cvtres1.exe
The download link is also specified in Knowledge Base article Q187280. - If necessary, download and install cvtres.exe onto your hard drive. Once you’ve decided where to store the file, enter the full path to the executable into the ‘Path to cvtres.exe’ textbox. You only need to do this once.
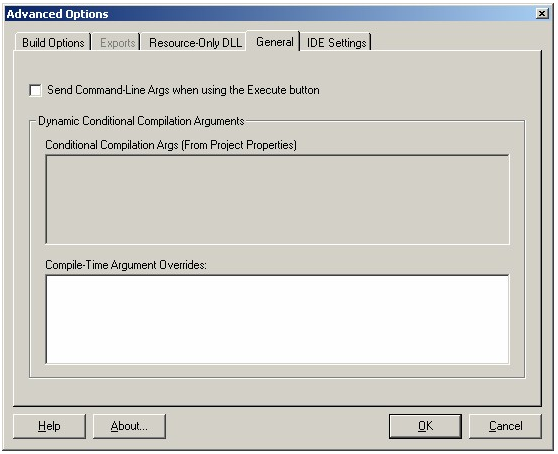 The General Tab of the Advanced Options dialog contains general project settings:
- Send Command-Line Args… – Use this setting to tell vbAdvance to send the command-line arguments that are set in the Project Properties dialog when you click the Execute button.
- Dynamic Conditional Compile Arguments – Enter compile-time conditional compile argument overrides here. Your existing arguments will be displayed but are not editable here.
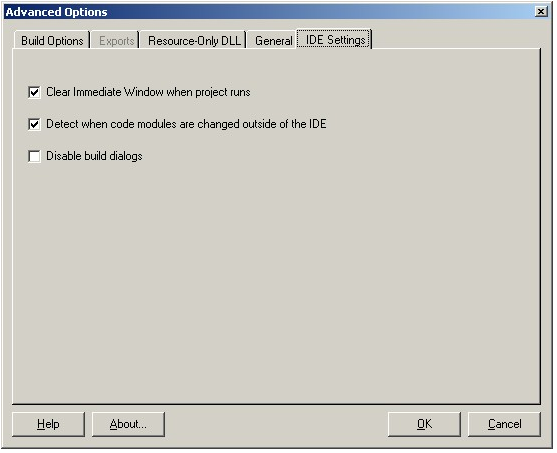 The IDE Settings Tab of the Advanced Options dialog contains the advanced IDE settings:
- Clear Immediate Window when project runs – This setting clears the Immediate Window automatically whenever you run your project in debug mode.
- Detect when code modules are changed outside of the IDE – This setting enables VB to detect when any loaded code modules are changed by an outside process. When a change is detected, you will be notified and given the option to automatically reload the affected module(s).
- Disable build dialogs – This setting eliminates the pair of dialogs that normally pop up when you build your project.
- CONSOLE – Tells Windows to launch the app within a Command Prompt.
- WINDOWS – Tells Windows that the app will provide it’s own windows.
- NATIVE – For native mode apps, such as device drivers. Not possible with VB.
- POSIX – For POSIX compliant applications. Not possible with VB.
- WINDOWSCE – Tells Windows it is a Windows CE application. You use a tool like eMbedded VB, or the .Net Compact Framework to build this type of application.
link.exe /edit /subsystem:console appname.exeWhere appname.exe is the name of your application.This approach works fine, but it requires the additional step after you’ve built your EXE, which is, at best, bothersome. It would be nice if VB would simply give you the option to build your EXE as a CONSOLE subsytem app in the first place. After all, the ability to do so is clearly built in to the VB linker, as we’ve demonstrated above. vbAdvance gives you this missing option. Simply check the “Build As Console Application” check box and VB will build your EXE with the subsystem already set to CONSOLE, so there is no post-build step required.The other half of the puzzle of how to build a Console app in VB is how to interact with the Command Prompt. How do you receive input, and how do you send output? Not only did Microsoft not provide the option to build a CONSOLE subsystem application, they also did not provide any language syntax for interacting with a Command Prompt. Fortunately, they did provide a way to call Win32 API functions, and this is where we turn for the answer.The ReadFile and WriteFile APIs have the ability to read from STDIN (the input pipe that receives text typed or otherwise input into the Command Prompt) and STDOUT (the output pipe that sends text to the Command Prompt).The Simple and Advanced Console samples demonstrate how to use these, and more, APIs to provide anything from very simple text output capability, to full-featured Command Prompt interaction and control.Another option is to use the Microsoft Scripting Runtime DLL (scrrun.dll). The FileSystemObject in this DLL allows you to access STDIN and STDOUT. We can’t recommend this approach due to problems with the Scripting Runtime DLL, but we wanted to mention it for the sake of completeness.Simple Console SampleThis example demonstrates how to build a Console application which simply outputs text to the Command Prompt. This demonstrates just about the bare minimum amount of code required to write to the Command Prompt.Two API calls are used:GetStdHandle
WriteFileGetStdHandle is used to get a handle to STDOUT, which we then pass to WriteFile, along with the text we want sent. A single helper function is used to wrap the API calls.Compile the project and run the “Simple Console Example.exe” from a Command Prompt. You will see the text “Hello world!” output to the screen.Advanced Console SamplesThese examples demonstrate how to build full-featured console applications in VB and are courtesy of Karl E. Peterson( www.mvps.org/vb ). Karl’s MConsole.bas module is a remarkable console-support module for VB, and contains everything you need to build full-featured, robust console applications in VB.To see just how powerful this module is, run each of the sample applications:ConDemo1.exe (Interactive.vbp)
Either run this from the command line or better yet from the IDE to see an example of how to build an interactive console application.ConDemo2.exe (PipedInput.vbp)
Run this from the command line like so:C:\Program Files\vbAdvance\Samples\Console Applications\Advanced\>dir | ConDemo2.exe— or —C:\Program Files\vbAdvance\Samples\Console Applications\Advanced\>ConDemo2.exe < temp.txtEither approach will copy whatever is piped into the app to the clipboard. This demonstrates how this console module provides support for piped input.ConDemo3.exe (ExitCode.vbp)
Run this from the command line like so:C:\Program Files\vbAdvance\Samples\Console Applications\Advanced\>retval ConDemo3.exe 55This demonstrates how the console support module provides support for error return values to your console application.Note that the DebugOutput method in these samples not only prints to the Immediate window in the IDE, but also to the system debug stream, which can be monitored with either of the following tools:http://grantschenck.tripod.com/dbwinv2.htmhttp://www.sysinternals.com/ntw2k/freeware/debugview.shtmlExports OverviewConceptsGenerally speaking, there are two types of DLLs in Windows. There are standard DLLs and COM DLLs. A standard DLL exposes all of it’s functions through exports. A COM DLL exposes it’s functions through a COM typelibrary interface (along with a few helper functions which are exported).VB allows you to call exported functions in a standard DLL (via a typelibrary or the Declare statement), but it doesn’t allow you to create them yourself. VB only allows you to build COM DLLs.There are some cases where it is desirable to build a standard DLL, such as in the case of a Control Panel Applet. A Control Panel Applet by definition must export one function that conforms to a specific name and footprint. Using VB alone, there is no way to build a Control Panel Applet. Another example would be some application plug-in architectures which require your plug-in DLL to provide exported functions. Again, using VB alone, you would not be able to build this type of plug-in.When you have vbAdvance loaded, you gain the ability to specify function exports in your VB DLLs. Any Public methods you have in your project that are located in a BAS module can be exported in your DLL.Exporting functions in a VB DLL is not a trivial thing to do. You should not attempt this without fully understanding what is involved. The following text and accompanying sample projects attempt to explain the pitfalls and possibilities. Done properly, standard DLLs in VB are a reality and open up a new world of possibilities with Visual Basic.Caveats / RequirementsVB apps are completely dependent on the VB runtime. The VB runtime ‘engine’ requires some initialization before it can be used. When you compile your app, VB is automatically adding code to your project to ensure the runtime is initialized when your app starts. When your DLL is called, this runtime initialization code runs and then your code runs, and all is well.However, what happens when you expose a new entrypoint into your DLL in the way of a function export? The VB compiler is not only not expecting this, it was never designed to handle the possibility in the first place. The result is that while you have a new exported function in your DLL, the VB compiler never creates the necessary runtime initialization code for that new entrypoint. If your export is called and the runtime has not been initialized, your DLL will GPF.So how do we get the VB runtime initialized? When you build your DLL, the VB compiler requires a Public Class in your project so that it can create a Public COM object interface for the DLL. It also adds the necessary runtime initialization startup code to the DLL, so that when this Public COM object is created, the runtime initialization code will run. All we have to do to initialize the VB runtime for our project, is to create this Public COM object once, and the internal runtime initialization code will run.Normally, you need to register a COM DLL so that an object within it can be created. However, this is not actually a requirement. You can create a COM object without the Registry and your vbAdvance installation contains a couple of support files that can be used to instantiate an object from your DLL without the need for the DLL to be registered.The export samples that are installed with vbAdvance demonstrate how to use the included support files to ensure that the VB runtime engine is initialized before your code executes. Once this requirement is met, writing standard DLLs in VB is easily achieved.You might be wondering how VB code can be used to initialize the runtime, when the runtime hasn’t been initialized yet – kind of a chicken and egg dilemma. The answer is very carefully. There is very little code that will run without GPFs when the runtime has not yet been initialized. Do not attempt to modify the runtime initialization code unless you know exactly what you are doing, and likewise, do not attempt to run VB code without the runtime initialized without a full understanding of what will and will not work.It’s important to understand too, that the VB runtime must be initialized on every thread that your VB code will run on. Typically, there is only one thread of execution, and initializing it the one time will suffice. However, depending on the calling process, it is possible that your exports will get called on different threads. You must ensure the runtime is available on each calling thread. Also understand that VB makes heavy use of Thread Local Storage, and so data set in one thread is not necessarily going to be available on another thread. vbAdvance will allow you to create your exports. It will not ensure that you use them wisely or correctly. Use this feature with care.If the intended caller of your DLL is another VB app, then you must understand how VB handles Strings in Declare statements. You have to realize that the String will be converted and no longer be available as a VB String. You can use a TypeLibrary to define the export in the caller instead of a Declare to get past this, but then the DLL will not unload until the calling process terminates. To get past that problem, you could use LoadLibrary / GetProcAddress and call the export dynamically, which requires some further reading that is beyond the scope of this help documentation. The VB Caller example demonstrates some of these interactions. Building a standard DLL in VB is probably more useful for non-VB callers than VB callers due to the odd way that VB does String conversion with the Declare statement.Exported functions cannot be debugged in-process as exports. You must debug the function as you would any other function in a BAS module. Alternatively, the OutputDebugString API can be used in conjunction with a good debug message viewer such as DebugView fromwww.sysinternals.com.ApproachesThere are a number of different approaches you can take with the exports feature, depending on what you want to accomplish. We break them down loosely here:- Standard DLL
- COM DLL with custom DllRegisterServer and/or DllUnregisterServer routines.
- Hybrid COM/Standard DLL
- DllMain is called, and the VB runtime engine is initialized.
- CPlApplet is called repeatedly with a different message each time. One of these messages is CPL_INQUIRE, which tells you to return a number of resource IDs where the system can find the icon for the Control Panel, as well as the string name and description for the Control Panel. The other message of interest is CPL_DBLCLICK which tells us to display our dialog. At this point we display the Form modally.
- Change the resource file resources accordingly. The Icon with ID 101 is displayed when the Control Panels window is open. The String with ID 101 is used as a tooltip and the String with ID 102 is used as the name of the Control Panel.
- Set up the FCPDialog form to your liking.
link.exe /noentry /dll /machine:i386 /out:project1.dll project1.resFor the linker to be able to build the resource DLL, the resource file in your project must be converted to a linkable file. This is accomplished by a utility EXE called “cvtres.exe”. This utility is not shipped with Visual Basic, and due to the fact that it is not redistributable, is not shipped with vbAdvance. Fortunately, it is not difficult to get a copy of this utility. If you have Visual C++ installed, then you already have a copy of cvtres.exe. If you don’t have Visual C++, you can download a self-extracting archive from Microsoft. At the time of this writing, the file was available at the following location:http://download.microsoft.com/download/vstudio97pro/Patch/1/WIN98/EN-US/Cvtres1.exeThe download link is also specified in Knowledge Base article Q187280.Once you have the cvtres.exe file installed, you need to specify the location of the file in the vbAdvance Advanced Options dialog, under the Resource DLL Tab. You need do this only once.Webmasters NoteI attempted to contact Karl Peterson, Young Dynamic Software, and the webmaster of mvps.org, with no success.I have approved the posting of this content on the basis that the persons or entities listed appear to have no further interest in the content, as well as the copyrights appear to have not been updated since at least 2007 for the content, or 2011 for mvps.org.If any of the people or entities listed above have questions, comments or concerns with this post, please don’t hesitate to use the contact form in the footer below to get ahold of me.
Attachments
| File | Uploaded | Size |
|---|---|---|
| 389-20190606-085910-vbAdvance.chm | 6/6/2019 8:59:10 AM | 203430 |
| 389-20190606-085848-vbAdvance3_1.exe | 6/6/2019 8:58:48 AM | 866867 |
